Monday, June 27, 2011

Frost With A Twist technique

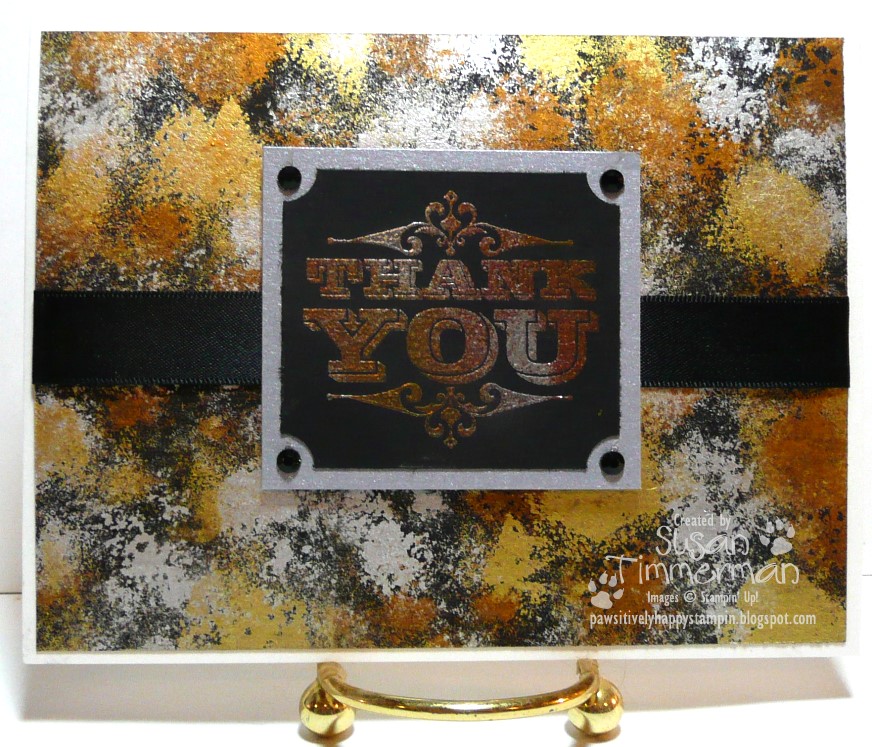
This is another really easy technique that gives a really neat effect. The technique is done on the "background" cardstock. All you do is brayer one color of dye ink onto glossy white cardstock. In this case I used Peach Parfait. Let the inked glossy white cardstock dry completely before continuing. Then, take a piece of wax paper and crumple it up really well. Flatten it out and use your brayer to brayer add ink to the wax paper. In this case I used Cajun Craze on the wax paper. Place the inked side of the wax paper over your cardstock and use to brayer to basically transfer the ink from the wax paper onto the cardstcok. Remove the wax paper and allow the cardstock to dry completely. You can stamp directly onto the cardstock or use it as a background as I did here! See? Told you it was easy. The hardest part is waiting for the cardstock to dry! Here is a list of the items I used to make this card.


Stamp set: Tiny Teacup


Cardstock: Cajun Craze, Peach Parfait, Whisper White, Glossy White


Ink: Peach Parfait, Cajun Craze


Other: brayer, wax paper, 1 1/4" Square punch, Scallop Square punch, gold brads, Peach Parfait 1/2" Stitched-Poly ribbon


All items made by/sold by Stampin' Up! (except for the wax paper of course!)

Saturday, June 18, 2011

Tinted Opaques technique

This was another fun and easy technique. All you need is dark cardstock, white pigment ink, markers to color your image, clear embossing powder, heat tool and a bold image stamp! Those are all pretty basic suppies that I'd bet most everyone has. You just stamp your image with the white pigment ink. Then, add the clear embossing powder and heat it. Then, use your markers to cover over the embossing powder. The color will bead on top of the embossing powder. Reheat with the color on top of the embossing powder. Color again (and again) until you get the color you like. The only thing is you have to color small areas and then heat set and then go back again with the same color if needed. After you get the color you want on that one area then move on to the next color. Heat set after each color. That's it! Takes a little time with all the "color, heat set, color, heat set...." but it's not too bad! Here are the products I used to make this card.


Stamp set: Inspired By Nature


Cardstock: Daffodil Delight, Always Artichoke, Basic Black


Ink: Whisper White


Other: clear embossing powder, heat tool, Ticket Corner punch, Dotted Scallop Border punch, 1/4" Daffodil Delight Grosgrain ribbon, stick on gems (not Stampin' Up!) and Stampin' Write markers in Always Artichoke, More Mustard & Chocolate Chip


All products (except stick on gems) made by/sold by Stampin' Up!

Saturday, June 11, 2011

Fossil Stone technique


My picture didn't come out good enough to really show you what this technique looks like. But, I like the card so I decided to show it to you anyway! The "splotched" lighter background piece is the piece with the technique. The basics of the technique are pretty simple. You need a plastic file folder or one of those sheet protector things. If you use the sheet protector you will want to trim two fo the edges so that you can open it up like a file folder. You will also need 2 coordinating colors of reinkers, 2 pieces of glossy white (or light colored) cardstock and a brayer. That's it! So, you open up the file folder/page protector and put a few drops of one of the inks on one side and a few drops of the other ink on the other side. Then close the file folder/page protector and "smush" them together. Air pockets in the "smushing" is good...it's even really good! Place your two pieces of glossy cardstock back to back with the glossy sides facing out. Open the file folder/page protector and place the cardstock on one side and close the file folder/page protector. Use your brayer to roll over the outside of the file folder/page protector. Keep rolling until you like the look of the ink on the cardstock. Open up the file folder/page protector and take out the cardstock. Set is aside to let it air dry. You now have enough to make TWO cards or other projects! Here are the items I used to make this card.


Stamp sets: Punch Potpourri, Teeny Tiny Wishes


Cardstock: Rich Razzleberry, Pacific Point, Whisper White, Glossy White


Ink: Rich Razzleberry, Pacific Point


Other: Big Shot, Elegant Lines embossing folder, Rich Razzleberry 1/8" Taffeta ribbon, glue dots, Stampin' Dimensionals, XL 2 Step Bird punch, Curly Label punch, page protector, brayer


All products made by/sold by Stampin' Up! (except the page protector)

Tuesday, June 7, 2011

Wood Grain Background technique

Yep...another really easy technique! Looks really cool no matter how easy it is though! You just use a toothbrush to drag the "wood" colors down your cardstock and then use a ruler to draw in the "boards". Can't be much easier than that! Here are the items I used to make this card.


Stamp sets: Countryside, Curvy Verses


Cardstock: Basic Gray, Whisper White, Chocolate Chip, Sahara Sand


Ink: Chocolate Chip, Basic Gray


Other: toothbrush, ruler, black marker, reinkers in Sahara Sand, Crumb Cake, Chocolate Chip, Cajun Craze & Basic Gray


All products made by/sold by Stampin' Up! (except toothbrush and ruler)


Friday, June 3, 2011

Metallic Background technique

Yep...another easy one! I think this technique would be really pretty using a darker green cardstock as the background and then use the metallic gold and/or silver and then use that for a Christmas card! Anyway, all you do is use the metallic reinkers and a pallete and sponge and dab the reinkers onto your dark colored cardstock. See? Told you it was easy. Again, the hardest part is waiting for the inks to dry so you can finish your project! A note on the embossing of the "Thank You": I used all three colors of embossing powder at once. I just stamped my image and then poured a little gold here and there, a little silver here and there and then some copper here and there. Then just shake off the excess and use your heat tool to emboss! Here is a list of the items I used to make this card.


Stamp set: Engraved Greetings


Cardstock: Shimmery White, Basic Black, Silver Metallic


Ink: VersaMark


Other: Encore reinkers in Gold, Silver and Copper, gold, silver and copper embossing powder, sponges, Ticket Corner punch, Basic Black Satin ribbon, Black Flourish Designer Jewels (from a previous mini catalog), Stampin' Dimensionals


All products made by/sold by Stampin' Up (even though some are now retired).

Thursday, June 2, 2011

Smooched Metal technique

I know I keep saying that most of these techniques are easy but...well...they are! This is another one that is really easy! All you do is take your Hodge Podge Hardware and paint it with the Smooch! The hardest part is waiting for the Smooch to dry so you can finish your project! While Stampin' Up! does sell some of the Smooch paints, they don't sell the color I used here. I've had these Smooch paints for quite a while and was happy to find this technique so I could use them! I need to get online and do and search for more things to do with the Smooch! Here is a list of the products I used to make this card.


Stamp sets: Love & Care, Tiny Tags


Cardstock/paper: Pretty In Pink, Basic Gray, Whisper White, Lap of Luxury DSP


Ink: Basic Gray


Other: Hodge Podge Hardware, Smooch Ink in Taffy, stick on gems, Ticket Corner punch, 1" Circle punch, Pretty In Pink 3/8" Taffeta ribbon, Stampin' Dimensionals


All products made by/sold by Stampin' Up! except the Smooch and stick on gems